
People directory
This functionality allows you to display a custom list of users as a People directory. Since Publisher is so customisable, the way to view this list will look different in almost all instances, but for example, you can view the people directory via 'Our People'.

This will display a screen, which contains the list of people, and additional customisable filter options.
Here, you can search for people, filter their name by the letter it begins with, or filter by job title, department, organisation and location. All of these options are optional and can be turned off.
Additionally, there is a
Download
button at the end of the list of people, this will let you download a list of your current list (and will be filtered if you have filtered it) as an Excel spreadsheet.Managing the people directory
Administrators can manage the people directory in the content hub. To access this, navigate to your profile dropdown and select
Content hub
.
And select
People Directory
on the right.
The following screen opens (please note, that there are additional options).
In the
Details
tab, the following fields are available:Field | Description |
|---|---|
Title | This is the title of your People directory. This is what will be displayed in menus and as the title shown at the top of the page. |
Permalink | A permalink or permanent link is a friendly URL, so as to be easy for people to type and remember. You can edit the link by clicking the pencil icon next to the link. |
Show user fields | Here, you can select which user fields each user will have displayed in the people directory. The list shown above is the complete list of user fields that you can show or hide. |
Filter options | These are the different options that you can select for your filters, to change how they are displayed. The options are.
|
Show filters | These filters enable you to search for people in the people directory in a different way. So if you want to find a group of people by organisation, rather than searching for each person separately - you can. All 6 filters available are.
And you can select to display all, some, or none (if you really want). |
Layout | The layout is the layout of the search results. You can select from either cards, list or a table. |
Default Ordering | This is the default ordering of the people directory. You can choose from either alphabetically by last name or alphabetically by first name. |
No. of items to display | This is the number of items (people) that will be displayed per page. |
Total no of items | This is the max number of items that will be displayed. |
SEO - Title | The title that is displayed when your people directory is displayed in search engine results. |
Description | The description that is displayed when your people directory is displayed in search engine results. |
Tags | Tags can be used to help optimise your search results in a search engine. |
Meta Robots | Meta robots help determine whether. 1) Your results are indexed by Google or not 2) Whether your page can be linked to from another page Additionally, you can preview what your results will look like from in search results preview below. |
Summary/Abstract | This field enables you to enter information which is then displayed as a summary. This allows you to add some supporting description text above your people directory. Additionally, you can unselect the Display summary checkbox if you do not want to display a summary at all. |

Select
Save
to save your changes.Name layout
You can select
Last Name, First Name
, as an option to search for people within the people directory.To set this, navigate to
Dashboards
> People directories
, via your drop-down menu> System admin
.
And select the
Name ordering
dropdown. Select either First name, last name
or Last name, first name
. Select Save
to apply your changes.You can also now choose your Alphabetic filtering setting via the
Alphabetic filtering
dropdown. This means, that when selecting a letter, depending on whether you have chosen, Last name or First name, the results are filtered.note
Please note that if you have a fully linked Collaborate and Publisher instance (with the unified user directory), as Collaborate is the master in this, Collaborate defines the Alphabetic filtering and therefore this option is disabled and will only display only the last name.
People tab
Click the
People
tab.This page allows you to choose who should be displayed in the people directory, whether it is all users who are in your instance, or perhaps a select group of users that you want to highlight. Here, you can select the
People source
, between selected people and all people.Additionally, you can add organisations or groups and all of their people will be added to the people directory. Either, search for the organisation or group using the search box, or select
Bulk add
to display the Bulk add
screen.In this screen, you can select multiple organisations and groups by selecting the checkbox next to each organisation or group. Once you have selected all the organisations or groups that you need, select
Add
. All the users who belong to these organisations or groups will be added to your people directory.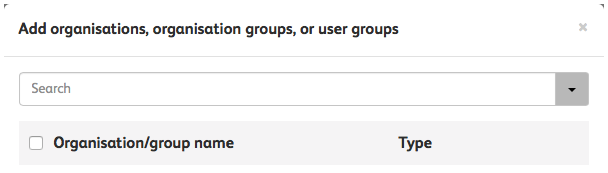
The
Organisation/group name
section lists all organisations and groups that are added as part of your people directory.Select
Save
to save your changes.Permissions
Click the
Permissions
tab. The permissions tab enables you to select who can see the people directory. By default, it is set to public, but you can also select
Restricted
which displays more fields.
If your permissions are set to restricted, you can restrict who sees the people directory by adding groups or organisations. All of the people in these groups or organisations will be the only ones who can see the people directory.
Either, search for the organisation or group using the search box, or select
Bulk add
to display the Bulk add
screen.In this screen, you can select multiple organisations and groups by selecting the checkbox next to each organisation or group. Once you have selected all the organisations or groups that you need, select
Add
. All the users who belong to these organisations or groups will have permission to view the people directory.
The
Organisation/group name
section lists all organisations and groups that have permission to view your people directory.Select
Save
to save all of your changes.Displaying fields from the Active Directory
As of version 5.4, we have enabled the ability to pull through some extra fields from the Active Directory which can be displayed and filtered on within the People Directory, and also whilst viewing the user's Profile from within Publisher.
note
Please note that if you have a linked instance, these extra fields from the Active Directory will not be visible if you were to view these fields from the Collaborate profile.
This means you can now pull through and display a wide variety of existing and custom fields from Active Directory which would be visible and filtered within the Publisher people directory.
To access this functionality, you must upgrade the appliance tool and to get more information on how to set this up, please contact your customer service manager.
Changing the wording of the people directory language
You can change the wording of the people directory language. To do this, navigate to your profile drop-down >
System admin
.
The
System admin
screen opens. Within the System admin
screen, navigate to Super Admin
> Languages
.
The
Languages
screen opens.For the language you want to edit, click
More actions
> Edit language
.
The
Edit language
screen will be displayed.
Within the
Edit language
screen, click the download button to download the latest bundle.
Once you have downloaded the latest bundle, search for the text you wish to change, copy and paste it into the
Customisation resource bundle
field and make your changes.Select
Save
to save all of your changes.note
Please note, if you don't have access to the above settings please contact your CSM.