Templates are useful for sending the same request item to multiple clients rather than uploading them individually to each Client Profile.
For example, if you need multiple clients to sign the Terms of Agreement form or review instructions, you can create and send the template to all clients simultaneously. Once the letter template has been sent, clients can review or sign the document based on the template settings.
To create a letter template, you can upload an existing PDF document or create one from scratch in TaxCaddy.
Create letter templates
Follow these steps to create letter templates.
note
Clients you already sent a letters template to won’t see your changes to the template reflected in their letter. To make changes to letters that have already been distributed to clients, go to the client's profile, select
Tax Documents
, and delete the letter from the client's Requested Items. You can then upload a modified letter on the client's profile.
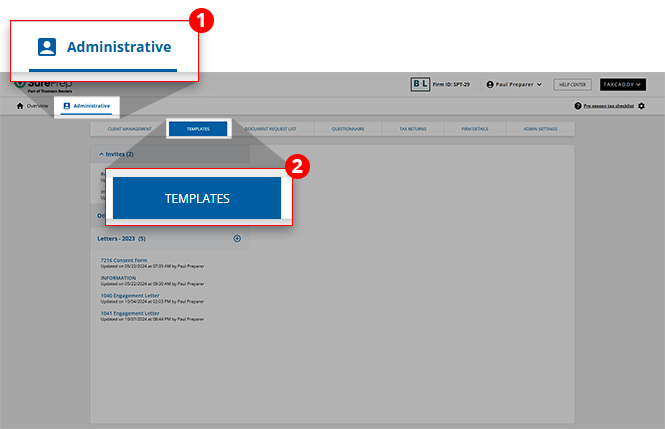
Sign in to TaxCaddy.
Select
Administrative
, then select
Templates
.
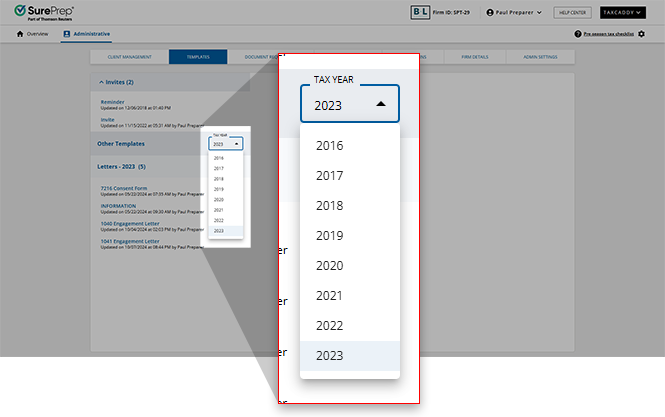
Ensure the correct year is selected next to
Other Templates
.
Next to
Letters
, select the
New
icon and then select
Create Your Own
.
Type a name for the new template and select
OK
.
The new letter is added to the list and opens in the editor.
From the
Client To
menu, select either
Review
,
Sign
, or
Sign E-file Authorization
.
Review
: The client marks the document as reviewed using the
Mark Reviewed
button.
Sign
: The client marks the document as signed using the
Sign & Accept
button and enters their first name as signature capture.
Sign E-file Authorization
: The client marks the document as signed using the
Sign & Accept
feature, enters their first name as signature capture, and then provides information to confirm their identity using knowledge-based authentication (if the
Require KBA
checkbox is selected).
note
Only 1 digital stamp is applied to each PDF. If you use a single PDF for both federal and state e-file Authorizations, only a single stamp will be applied.
For documents that require a signature, select whose signature is required from the
Sign By
dropdown menu.
note
The
Sign By
drop-down menu is only available when
Client To
is set to
Sign
or
Sign E-File Authorization
.
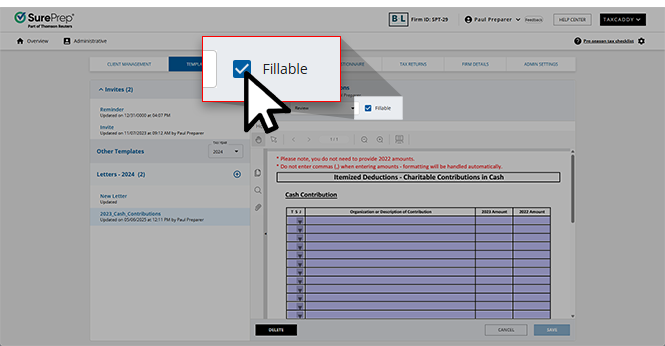
When applicable, users can select the
Fillable
checkbox to indicate that this letter template contains fillable fields that taxpayers will be able to provide records to when completing this request.
For
Sign E-File Authorizations
, select the
Require KBA
checkbox to indicate whether or not a client must undergo KBA (knowledge-based authentication) to fulfill this request.
Edit the template using the template toolbar.
note
For best results, we recommend setting text-alignment to
Justify full
in Letters templates.
Sending an invite letter formatted from Microsoft Word may not display properly. You can copy paste plain text, then format the letter using TaxCaddy's built-in template features.
Images uploaded to your template must be less than 100 KB. You can also include an image from your website, web hosting account, or an image hosting service.
To use
Mail Merge
, place the cursor where you want to include a mail merge field, select
Mail Merge
, then select a merge field.
To preview the template, including mail merge data, select
PREVIEW
.
note
The preview mode displays sample data and doesn’t use mail merge data from your clients.
When you're done editing the template, select
SAVE
. The template is ready to be sent to clients via the


 in Letters templates.


 Article