Set up employee to receive direct deposit payroll checks

If you offer a direct deposit option for employee payroll checks, you'll need to set up direct deposit information for the employee bank accounts. First, you'll need to set up direct deposit information for the
firm bank and the client
bank accounts, then take the following steps. This will make employee direct deposit and allocation information available for payroll check printing.
  1. Select
    Setup
    , then
    Employees
    .
  2. Select the
    Employee
    .
  3. If the employee will use International ACH Transations (IAT), you'll need to complete all of the
    Addresses
    section of the
    Main
    tab.
  4. Select the
    Direct Deposit
    tab.
  5. Under Net Pay Distribution, use the
    Deposit
    dropdown to choose how much employee's pay should be by direct deposit.
    Example
    Employee screen with Direct Deposit tab active. Three are 2 sections: Net Pay Distribution, then Direct Deposit Allocation. In the first section, the Deposit dropdown list has been selected to reveal the options: All, All except fixed amount, Fixed amount, None, Percentage.
  6. Under
    Direct Deposit Allocation
    , specify how the direct deposit amount to allocate to the employee's bank accounts.
    note
    An employee can have several bank accounts set up. You can base allocation percentage calculations on the total distribution or remainder of the distribution.
    Employee screen with Direct Deposit tab active. Three are 2 sections: Net Pay Distribution, then Direct Deposit Allocation. In the first section, the Deposit field is set to All and the Amount/Percent field is inactive. In the second section, Total distribution has been selected. There's a grid with 7 columns: Bank, Account Number, Account Type, IAT, Amount, Percent, and Status. In this example there are 2 rows in the grid. Each row is for a Checking Account Type, but the Bank and Account Number are different for each row.
  7. If this employee will use IAT:
    1. Select the ellipsis button in the IAT column. 
    2. Specify that this direct deposit allocation uses
      international format
      .
    3. Set up the
      US gateway operator
      and
      destination country
      information.
  8. Enter information for one or more bank accounts and specify an amount or percent to allocate to each.
    note
    There are some examples at the end of this help topic.
  9. For new employees or new direct deposit bank account information, select
    Prenote
    in the
    Status
    column.
    note
    After the bank has prenoted the account, change the bank account status to
    Approved
    . This will enable the application to create direct deposit files.
    The
    Status
    options are:
    • Approved
      : you've set everything up and this vendor's bank account is ready for direct deposit.
    • Needs authorization
      : you've set everything up, but this vendor needs authorization before you can process direct deposit.
    • Prenote
      : you've set everything up, but this vendor's bank account information will be prenoted before live processing.
    • Suspend
      : you've set everything up, but this vendor doesn't currently use direct deposit. This option saves the information for when the vendor uses direct deposit again.
    • Waiting
      : The bank account information has been prenoted. We are waiting for the prenote to be approved.
  10. If you want to set up alternate direct deposit allocation information for an employee:
    1. Mark the
      Enable alternate direct deposit allocation
      checkbox.
    2. Enter information in the grid.
  11. If you want to use the alternate direct deposit allocation, take the following steps:
    1. Go to
      Actions
      , then
      Enter Batch Payroll Checks
      .
    2. Select
      Edit
      , then
      Options
      .
    3. Mark the
      Use alternate direct deposit allocation
      checkbox for the selected payroll schedule.
  12. If the employee is a paycard recipient, mark the
    Paycard recipient
    checkbox.
  13. Select
    Enter
    .
Setup example: Scenario 1
An employee always wants $100 deposited into a savings account, and 100% of the balance deposited into a checking account.
Employee screen with Direct Deposit tab active. Three are 2 sections: Net Pay Distribution, then Direct Deposit Allocation. In the first section, the Deposit field is set to All and the Amount/Percent field is inactive. In the second section, Total distribution has been selected. There's a grid with 7 columns: Bank, Account Number, Account Type, IAT, Amount, Percent, and Status. In this example there are 2 rows in the grid. The first row has Savings as the Account Type and 100.00 as the Amount. The second row has Checking as the Account Type and 100.00 as the Percent.
note
In this scenario, it doesn't matter if
Base allocation percentage calculations on
is set to
Total distribution
or
Remainder of distribution
. This is because the application can't allocate more than is left over as a result of allocations in previous rows.
In this example, if net pay is $1000, and $100 is deposited into savings, then $900 remains. Even though the second row indicates 100% of the total distribution, it will only take 100% of what is left over (in this example, $900).
Setup example: Scenario 2
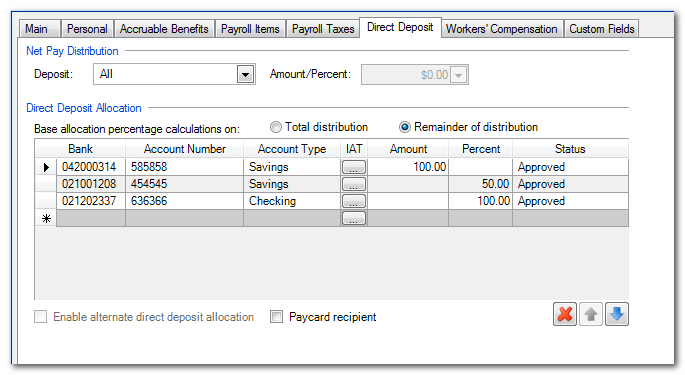
An employee always wants $100 deposited into a savings account. They also want 50% of the remaining amount deposited into a different savings account. Whatever is left, they want deposited into a checking account.
Employee screen with Direct Deposit tab active. Three are 2 sections: Net Pay Distribution, then Direct Deposit Allocation. In the first section, the Deposit field is set to All and the Amount/Percent field is inactive. In the second section, Remainder of distribution is selected. There's a grid with 7 columns: Bank, Account Number, Account Type, IAT, Amount, Percent, and Status. In this example there are 3 rows in the grid. The first has Savings as the Account Type and 100.00 as the Amount. The second row has Savings as the Account Type and 50.00 as the Percent. The third row has Savings as the Account Type and 100.00 as the Percent.
note
In this scenario,
Base allocation percentage calculations on
needs to be set to
Remainder of distribution
. This is because it's possible that more than 50% of the total distribution is left after the fixed $100 dollars is allocated. So, if the net pay was $1,000, then $900 remains after the $100 fixed amount. Because
Remainder of distribution
is marked, the application allocates $450 (half of what's left). If the
Total distribution
checkbox is marked, then $500 is allocated to the second savings account.
Setup example: Scenario 3
An employee wants half their check direct deposited in a savings account, and the other half on a paper check.
Employee screen with Direct Deposit tab active. Three are 2 sections: Net Pay Distribution, then Direct Deposit Allocation. In the first section, the Deposit field is set to Percentage and the Amount/Percent field is set to 50.00%. In the second section, Total distribution is selected. There's also a grid with 7 columns: Bank, Account Number, Account Type, IAT, Amount, Percent, and Status. In this example there is 1 row in the grid. It has Savings as the Account Type and 100.00 as the Percent.
note
The Net Pay Distribution section is where you specify how much of the check should be direct deposited (in this example, only 50%). The percentage in the Direct Deposit Allocation section is set to 100%. This is because 100% of the amount to be direct deposited needs to go in the one savings account.
In this scenario, if you go to
File
,
Print Checks
, there will be a payroll check with a partial direct deposit allocation to print. You'll need to print the check to send the check information to the
Process Direct Deposit
screen of the
Actions
menu.

Related content

error-icon

Triva isn't available right now.

Check out the support page for our phone number and hours

error-close