
Events
Events allow you to create and manage all your corporate events including conferences, seminars and training programmes.
Additionally, you can customise and permission your content to deliver both employee and client event requirements, manage capacities, attendees and waiting lists using the one-click registration process meaning you can manage attendees for all events from one place.
You can easily:
- Create and manage different types of events.
- Create dynamic delegate lists to allow the ease of management of your contacts and audience
- Add additional content such as speakers, contacts and related materials
- Set event capacities and when reached automatically show as fully booked
- Manage restricted organisations, users and unsubscribers
- Includes full auditing and reporting for events
- Tightly integrated with the Campaigns and Form builder features allowing you to send customised emails to event attendees and provide custom registration forms.
Creating an Event
To create a new event, navigate to your 
Profile
> Content hub
.Select 
Add content
, followed by Event
.In the 
Add Event
screen, you'll need to fill in the details for your event before moving on to the content.Select a module via the
Modules to publish to
drop-down.
This selects which modules that your event will be published to. Once you have selected one or more modules, the module names are added to the list.

If you have selected the wrong module, click the red
x
and select a different module.Now, you need to select the permissions, relating to the event.
Select whether the publication will inherit the module permissions, have restricted permissions or public (full access).
If you select
Inherit module permissions
, then the publication will inherit the module permissions.Additionally, you can select
View permissions
to view the current module permissions.
Select
Close
to close this screen.If you select
Delegates Only
, only delegates will be able to see the event. Delegates are users who have been specifically invited to the event.If you select 
Public
, the publication will be published so that anyone who navigates to that page can view the publication whether they are signed in to Publisher or not.If module permissions are restricted in any way, there will be an option to enable
Public teaser access
.If you select
Public teaser access
, you will allow a small teaser of the publication to be available to the public, with a registration link, allowing users to sign up to the platform, and enticing them to sign up to read the full article content.This displays the current module permissions.
- Additionally, you must select the Event Type. This will be eitherEventorMicrosite
- An Event type will let you display events with our standard event template, giving you a single landing page with event details in a standard layout
- A Microsite type will let you build out a custom set of pages for an event, allowing you to build out a multi-page experience for your events
note
The following documentation will show how to build an Event type of event content.
Once you have selected the module, permissions and event type, select
Next
. The Content
tab is now selected, and new options are available.Here is where you can enter content for your event.
In the
Content
tab, you have access to the following fields:- Title- This is the title of your event
- Image- This is the image used next to your event when you refer to it from other places, for example, from a content list panel in a dashboard. You can also select theDisplay as hero imagecheckbox, to display the chosen image as a hero image in the event
- Summary / Abstract- This field enables you to enter information that is displayed as a summary. So a user viewing this event can read the summary on it, before clicking further. Additionally, you can unselect theDisplay summarycheckbox if you do not want to display a summary at all
- Keywords- This allows you to enter tags for the publication, which enables people to search for publications easily
- Main Content- This is the main content of the event. This is where you can post the information about your event
- Related Material- The related material section enables you to display material to the user, that is related to the content that they are currently viewing. Related material might be a Publication, an Event, a Video, a Document, or an external link. SelectAdd related materialand select the piece of material you want to be displayed as related material from theAdd related materialscreen. Click the redxnext to the related material, if you no longer wanted to display that piece of material
- From- This is the date and time that the event will start. (If the event is an all-day event, you won't need to select a time)
- To- This is the date and time that the event will finish. (If the event is an all-day event, you won't need to select a time)
- Timezone- This is the timezone in which the event will take place
- Speakers- If there are any speakers at this event, you can select them by searching them in the search field. (These users will have to already be in the Publisher instance, to be able to search for them. If they are external, you can add them via theAdd speakersbutton. The other options here enable you to choose to show/hide the speakers, and whether you want to show their email addresses, job titles, locations and phone numbers
- Location- This is the location of the event. If the location is not in your Publisher instance, you can add a new location via theAdd locationbutton
- Capacity- The capacity of the event (the number of people that can attend)
- Contacts- Showing contacts enables you to show a contact related to the event. So if a reader has any questions at all, they can contact the relevant people. You can search for users in the Publisher instance or add them manually. Additionally, you can choose to display different information about them, including job title, location and email address etc.
- Permalink- This is the link that will direct the user to the event. You can edit the link by clicking the pencil icon next to the link
- Author- Here, you can select who is the author of the event, if you want to change it from the person that created the event, to another user. Start entering the name of the other user and select them from the suggested results
- Event Contact- This is the contact email address for the event
- Metadata- This is any metadata linked to the event.
- Comments- Allows you to enable or disable authenticated users to add comments to the publication. Please note this does not have forum capabilities
- Navigation- Users can add navigation menus which allow for easier navigation between content and sections of your site
- Metadata masking- This allows you to tag your publication with metadata but it will not be displayed to users
- SEO - Title- The title that is displayed when your event is displayed in search engine results
- Description- The description that is displayed when your event is displayed in search engine results
- Tags- Tags can be used to help optimise your search results in a search engine
- Meta robots- Meta robots help determine whether:
- Index- Your results are indexed by Google or not
- Follow- Whether your page has been linked to from another page, and
- NoArchive- Prevents Google from archiving your pages
- Additionally, you can preview what your results will look like from the search results preview
- Form- The form will replace the attending list in your event, with a custom form, selected from a list drawn from the Publisher instance
Default time zone
You can set a default timezone at the module level, for an Event. This ensures that every time an event is created, it will be set with the intended time zone.
To set a default time zone, within the
Events
module, navigate to Details
> Content Settings
.Scroll down until you see the 
Default TimeZone
drop down and click it. Set which Time zone you want to set as your default and then select Save
.Your new default timezone will be set.
In addition to being able to set a default time zone in events, you can also now display that time zone within your event.

To display the time zone, navigate to your event >
Content
and mark Display TimeZone
checkbox.
Once you have entered all the details for your publication, you have three further options. These options include;
Preview
which allows you to preview your content yourself, Save draft
which lets you save your event as a draft and Next
which displays the Delegates
tab.The following are displayed differently for different permission levels:
Public events
Delegates are added as they register. For public users to register, there must be a form for users to fill out.
Restricted events
Only users who have permission to view the page can register.
Delegates only
Administrators can set a specific group of users to invite to the event (these are the delegates). These users then need to RSVP to the event.

If your event is set to inherit module permissions only, you see the above screen. This list is populated as people are invited and join the event. And the report tab gives you a list view of all delegates, which you can export, via the
Export
button.
Finally, click either
Save draft
to save your event as a draft, or Publish
to publish it.If your event permissions are set to
Delegates only
, you can add additional delegates.
Adding delegates
In the
Details
tab, you can add Groups
, Preferences
, Text lists
and Uploaded lists
.
Groups
Select the organisation, organisation group or user group from the list, or search for the one you want to add. After selecting your groups, select 
Add
.All users in the group will be added as delegates to the existing list.
Preferences
Select
Add
> Preferences
to add the preferences you want to use to add delegates, then select Add
.
All users with the selected preferences will be added as delegates to the existing list.
Text list
Select
Add
> Text list
to enter or paste a list of email addresses you want to add as delegates.
Select
Next
and confirm the email addresses then select Add
.
All users with valid email addresses will be added to the list of delegates.
Uploaded list
Select
Add
> Uploaded list
to upload a list of delegates.
Enter a name for the list, then browse for the list on your computer. Additionally, you can download a sample document by clicking
Sample upload document
.Select
Next
and confirm the addresses are correct. Select Add
.All users with valid email addresses will be added to the list of delegates.
Additional actions
There is an additional
Action
drop-down menu, available once you have selected one or more delegates from the list of delegates.
Add to exclusions
Adding to exclusions allows you to bulk add a list of people, but select a few that you don't want invited. This way, you can invite 100 people and exclude 5, rather than having to add 95 separately.
Clicking
Action
> Add to exclusions
displays the following screen:takes you to a confirmation screen.
Select
Add
to add the user(s) to the exclusion list or select Cancel
to cancel. Send email
This option is only available for instances where the campaigns module is enabled.
Clicking
Action
> Send email
to add a new campaign or use an existing one.
After selecting your campaign, more fields will become available.
Administrators can
re-send an existing Campaign email
, similar to sending an existing email to event delegates.If you are sending an existing email, select the email name from the drop-down. If you are sending a new email, select 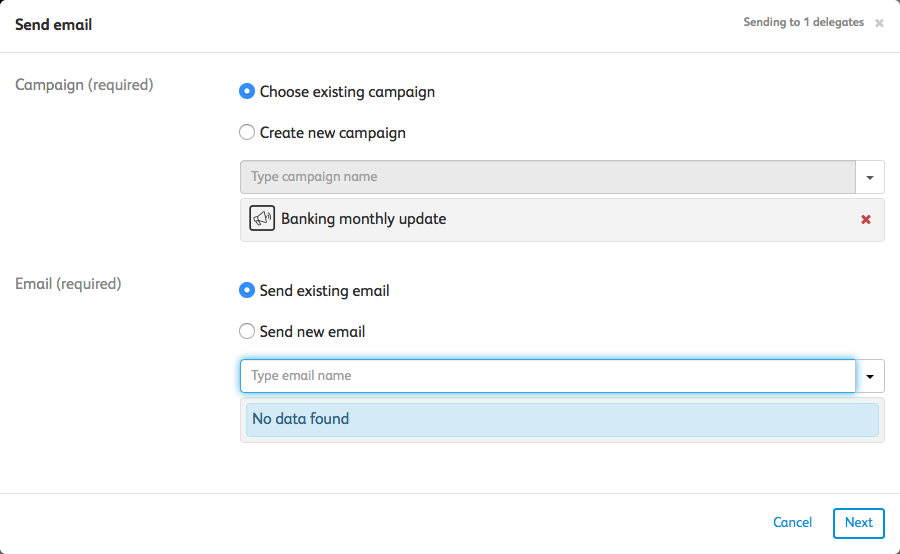
Send new email
. New fields will be displayed, relating to the email.Once all information is entered, select
Next
. The Send email - content
screen is displayed, which contains several elements that you can edit and tailor specifically. Additionally, in this screen, you can preview your email and send a test of your email. Select Next
. The Send email confirmation
screen will be displayed. Check the email, and select Send
.Managing sources
Select
Manage sources
to display the Delegate sources
screen and make changes to your delegate sources.
Exclusions
The exclusions tab shows a list of people who have been excluded from your event. This enables you to add pre-populated lists from the Publisher instance, and then exclude one or two of them. Click the
Exclusions
tab to display all the people excluded from the event.
Additionally, you can save your event as a draft, or publish your event from this tab.
Report
Select the
Report
tab for an overview of all delegates linked to the event.Here, you can see who is a delegate, access their email address and organisation, see whether they have submitted to the event and at what date and time.
Additionally, you can export the details of all delegates by clicking
Export
.Finally, select
Save as draft
to save your event as a draft, or select Publish
, to publish the event.Administrators can change the publish date of an Event content piece, within the
Content admin
/ Edit
pages. This means it is now possible to have either the approval date, custom date, or keep the existing date.
Video conferencing links in Events
We can include video conferencing links in Events. To utilise this new feature, when editing an event, you will now see an
Event Type
drop-down.note
Please note that any existing events would need to be changed from offline to online, so this new feature will not impact any existing events.
If the event is Offline, a location can be selected from the
Location
drop-down menu.
If the event is an Online event, then the location drop-down (shown above) will no longer be displayed. Instead, a URL field will be shown, where the user can add a URL for the event.
note
Please note that you must include https:// for your URL to work.

note
Please note that if left the URL field is left blank then nothing will be displayed.
Related Content
-
Create content modules
Format: Article,
5 min read
Article,
5 min read