
Creating a content publication
Publications allow you to create and publish your blog posts, publications, thought leadership and current awareness. Create elegant online content or upload your own documents. Extend the content reach by tagging it against the customisable metadata and allow your clients to pull the relevant content via their daily or weekly digest emails. Create engaging content by integrating rich media sources from the platform and facilitate discussions around content with the commenting system.
Publications allow you to:
- Create engaging online publications and posts or add attachments
- Search across all publications including full document content
- Filter publications using the powerful system metadata engine
- Create "Hot topics" for trending industry news and important events
- Add content as a favourite to quickly access it when you need it
- Share a link to a document with a personalised message and email address
- Embed videos, images and tables into engaging publications and articles
- Insert links to other publications and add other "Related materials"
- Add contact and author information so clients can contact editors for more info
- Allow users to make comments and have discussions around your content
- Users can print all comments on a publication when printing the entire article
A collection of Publications will belong to a Module, and each module can have different settings for how publications are structured, so the screens below will differ depending on how the module that the publication belongs to is structured.
To create a new publication, navigate to your 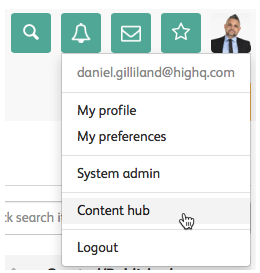
Profile
> Content hub
.Select 
Add content
, then Publication
.In this screen, you must fill in the details about the publication before moving on to managing the content of the publication.
Select the module that you want to use, via the 
Modules to publish to
dropdown.If you have selected the wrong module, click the red 
x
and select the correct module.Now select permissions relating to the publication. You can choose whether the publication will inherit the module permissions, have restricted permissions or be public (full access).
If you select
Inherit module permissions
, then the publication will inherit the module permissions.You can select 
View permissions
to view the View module permissions
screen.Select
Close
to close this screen.If you select 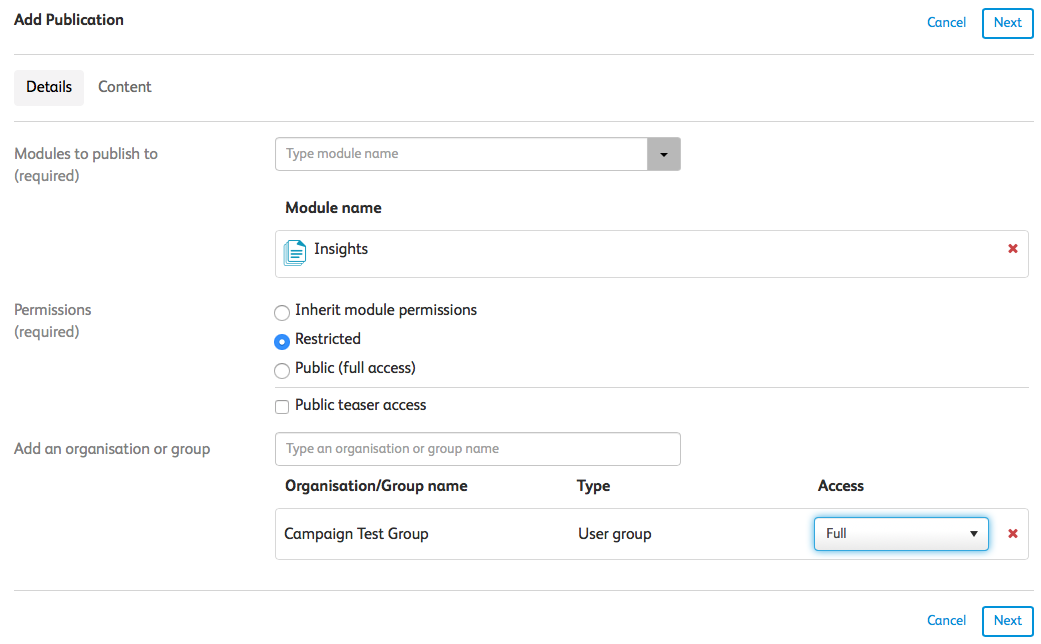
Restricted
the Restricted
option, the Add an organisation or group
field opens. Here, you can add any organisation, group or organisation group that should have access to the publication. If a user is not a part of any of the groups, organisations or organisation groups added to this list, they cannot view the publication.After selecting an organisation or group, the 
Access
dropdown lets you select what kind of access the selected organisation, group or organisation group has.If you select
Public
, the publication will be published so that anyone who navigates to that page can view the publication whether they are signed in to Publisher or not.If module permissions are restricted in any way, there will be an option to enable
Public teaser access
.If you select
Public teaser access
, you will allow a small teaser of the publication to be available to the public, with a self-registration link, allowing users to sign up to the platform, and enticing them to sign up to read the full article content.note
Please note that as of our December 2023 release, the 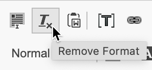
Summary
/Abstract
field will have the 'Remove
format
' option, similar to the Main content
field.
Once you have selected the module and permissions, select
Next
. The Content
tab will now be selected, and new options will be available to you.In the
Content
tab, you have access to the following fields:Field | Description |
|---|---|
Title | This is the title of your publication. |
Summary/ abstract | This field enables you to enter a summary of the publication. This summary text is displayed in dashboard panels when listing content and is also displayed at the top of a publication. Additionally, you can unselect the Display summary checkbox if you do not want to display the summary in the publication. |
Keywords | This allows you to enter tags for the publication, which enables people to search for publications easily. |
Contacts | Showing contacts enables you to show a contact related to the publication. So if a reader has any questions at all, they can contact the relevant people. You can search for users that exist in the instance of Publisher or add them manually. Additionally, you can choose to display different information about them, including job title, location, email address, phone number, avatar, organisation image, facebook, twitter, LinkedIn |
Next review date | This allows you to set a review date, allowing you to be notified in the future to check the content and see if it needs to be updated. |
Include in email notifications | Select this checkbox if you want this publication to be included in users' email notifications. |
Main Content | This is the main content of the publication. Additionally, you can choose what level of the table of contents you want to be displayed via the Table of contents drop-down menu. This includes headings only, headings and sub-headings, or turning off the table of contents completely. |
Subtitle | A line of text below the main title. |
Related Material | The related material section enables you to display material to the user, that is related to the content that they are currently viewing. Related material might be: a Publication, an Event, a Video, a Document, or an external link. Select Add related material and select the piece of material you want to be displayed as related material from the Add related material screen. Click the red x next to the related material, if you no longer want to display that piece of material. |
Image | This is the image used next to your publication when you refer to it from other places, for example, from a content list panel in a dashboard. You can also select the Display as hero image checkbox, to display the chosen image as a hero image in the publication. |
Permalink | A permalink or permanent link is a friendly URL, so as to be easy for people to type and remember. You can edit the link by clicking the pencil icon next to the link. |
Author | Here, you can select the author of the publication, if you want to change it from the person that created the Publication, to another user. Start entering the name of the other user and select them from the suggested results. |
Metadata | This enables you to select metadata for the publication, which enables people to find and search for publications easily. For more information on metadata, click here. |
Attachment(s) | Enables you to add an attachment to the publication. |
Comments | Allows you to enable or disable authenticated users to add comments to the publication. Please note this does not have forum capabilities. |
Development date | This is a date that can be used in place of a published date. It enables you to select an alternative date when creating content that allows you to publish an announcement on one date, but also have a separate date for when the legislation in the announcement is to go live. |
Navigation | Users can add navigation menus to allow easier navigation between content and sections of your site. For more information on navigation, click here. |
External link(s) | This enables you to link to external content. |
Include in email notification subject line | This will include this publication title in email alert subject lines. |
Location | This is a location that is predefined at the organisation level. |
Metadata masking | This allows you to tag your publication with metadata but it will not be displayed to users. |
SEO Settings - Title | The title that is displayed when your event is displayed in search engine results. |
SEO Settings - Description | The description that is displayed when your event is displayed in search engine results. |
SEO Settings - Tags | Tags can be used to help optimise your search results in a search engine. |
SEO - Meta Robots | Meta robots help determine whether: Index) Your results are indexed by Google or not Follow) Whether your page has been linked to from another page, and NoArchive) Prevents Google from archiving your pages Additionally, you can preview what your results will look like from in search results preview below. |
Published date | The published date is the date that the publication will be published. You can select either on approval, or select a specific date that the publication will be published. |
Date format | The date format drop-down allows you to choose a date format that is relevant for you and your users. |
Include in email notification | Include in email notification: If you are using the Content preference email that sends out Daily/Weekly/Monthly content, this check box will be very important (if you don't remove it from the content elements of the module as it isn't needed). When you first create a piece of content, this check box is selected by default. So when you save, the content will be set up to be sent out in the daily alert. However, if you or anyone else goes into the content before the Content preference email is sent out, this box will be unchecked again, as a default setting, so you will need to select it again.When you select the Include in Email notifications check box, two more options will become available and the below scenarios will help you determine which option you should select:
|
Once you have entered all the details for your publication, you have 4 further options. These options include;
Preview email
which enables you to email the publication to other users, who can then preview your publication before it is published; Preview
which allows you to preview your content yourself in a new window; Save draft
which lets you save your publication as a draft; and Publish
, which lets you publish your publication, and makes it visible to all users who have permission to view the publication.Automatic Archive
You can keep on top of your online content with HighQ Publishers new Auto-Archive feature, removing administrative burden for content admins through the setting of end date triggers - to automatically archive content that is no longer relevant.
note
Please note that as of our December 2023 release, you will no longer be able to select a date in the past as the date you want to auto-archive content on
If you want this new feature to be included within your content elements, you must add it to the content elements section within the module. To do this, navigate to:
Content Hub
> Module name
> Content Elements
> + button
> Auto Archive date
> Save
.This will ensure this feature is available to you within your content elements. For more information on content elements, please click here.
To set a date for your content to auto-archive, select the calendar icon next to the 
Automatic archive date
field when adding or editing content, and select the date you want to archive your content.Select
Publish to save your changes.
note
Please note that your content will not be automatically archived if this field is left blank.
Editor/Approver workflow
Publications have a built-in content creation workflow, which includes both editor and approver roles, facilitating an approval process for content before it goes live.
For more information on the editor/approver workflow, click here.
Viewing draft publications
You also can view draft publications in the same format as they will be displayed, once published.
To do this, when viewing the draft publication, select the link to view the article in a browser.
Snippet Permissions
We have introduced default permissions for snippets, to help administrators when setting up snippet permissions for organisations or groups and preventing the accidental setting of restricted content to public.
note
Please note that it is the default that has been set to Public, forcing users to change this to restricted.
When creating a snippet, users will now have to change the permission from Restricted to Public.
Additionally, snippet default permissions are now set to Public by default. To change this to Restricted, please contact the HighQ support team.