Terminal server setup examples and installation procedures
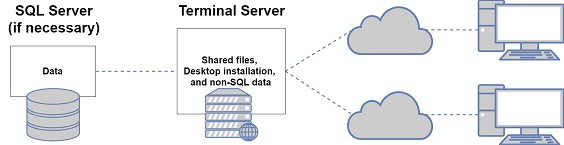
Standalone terminal server
In a standalone terminal server setup, each workstation connects remotely to a terminal server.
Follow these steps to install and set up CS applications in an environment with a standalone terminal server.
Work directly from the terminal server console.
Sign in as an administrator.
Change to
install mode
by entering
change user /install
from a command prompt.
Install to a local drive (for example,
C:\Wincsi
) on the terminal server.
Open the application and install the application licenses while still in install mode.
Return the terminal server to
application mode
by entering
change user /execute
from a command prompt.
CS Professional Suite applications don't need to be installed on the remote workstations.
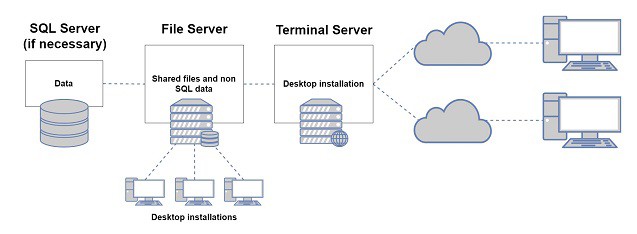
Terminal server with a separate file server
In a terminal server with a separate file server setup, CS Professional Suite applications run on the terminal server while data and system files are stored on the file server.
Workstations may connect remotely to the terminal server or directly to the file server to access CS Professional Suite applications.
If your firm uses both a terminal server and a separate file server, we recommend that the complete installations of the CS Professional Suite applications are to be made from the terminal server console in
install mode
to a local drive on the terminal server, then you can point the data and system files to the file server via a UNC path.
It's critical that you use consistent UNC paths between the terminal server and the file server for the data and system files.
If other LAN workstations will access the applications via a UNC path to the file server, a separate installation of the application needs to be run on the file server, and a separate desktop setup installation is needed for each local workstation. However, a separate installation is not needed for workstations that access the terminal server remotely.
Follow these steps to install and set up CS Professional Suite applications in an environment with a terminal server and a separate file server.
Work directly from the terminal server console.
Sign in as an administrator.
Change to
install mode
by entering
change user /install
from a command prompt.
Install to a local drive (for example,
C:\WinCSI
) on the terminal server.
Open the application and install licenses while in still install mode.
Return the terminal server to
application mode
by entering
change user /execute
from a command prompt.
Point the data and system files within the application to the file server via a UNC path.
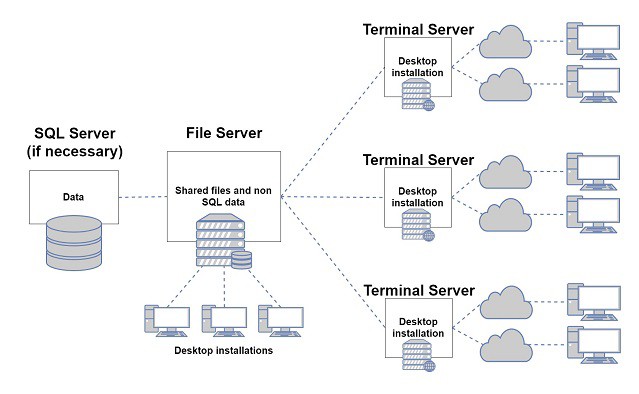
Multiple terminal servers with a separate file server
If your firm uses multiple terminal servers and a separate file server, we recommend that the complete installations of the CS Professional Suite applications are made via install mode from the terminal server console to a local drive on each terminal server.
Any application updates need to be performed on each terminal server where the application is installed. If other LAN workstations access the applications via a UNC path to the file server, a separate installation of the application needs to be run on the file server, and a separate desktop setup installation is needed for each local workstation. However, a separate installation is not needed for workstations that access the terminal server remotely.
It's critical that you use consistent UNC access between the terminal server and the file server for the data and system files.
Follow these steps to install and set up CS Professional Suite applications in an environment with multiple terminal servers and a separate file server.
Work directly from the terminal server console.
Sign in as an administrator.
Change to
install mode
by entering
change user /install
from a command prompt.
Install to a local drive (for example,
C:\WinCSI
) on the terminal server.
Go to the application and install licenses while still in install mode.
Return the terminal server to
application mode
by entering
change user /execute
from a command prompt.
Point the data and system files within the application to the file server via a UNC path.
Repeat steps 1 through 6 for each extra terminal server.
Considerations for proper installation
For a network installation of any application that is designed to run on a Microsoft Windows operating system, it's important that network access via universal naming convention (UNC) paths is consistent across all computers and servers that will access the application and its data.
When installing applications on a terminal server, be certain all users are completely signed out of all terminal server sessions. Rebooting the terminal server before installing will ensure no users or applications are open during the installation process. If you're prompted to restart your terminal server after the installation, be sure to do so.
The installation procedures for CS Professional Suite applications vary slightly depending on your terminal server setup. Details are given later in this topic.
You need to manually change the server to install mode when installing CS Professional Suite applications on a terminal server. This is important because it lets multi-user installation and proper access to writing user files and registry entries.
We strongly recommend that you work from the terminal server console for the installation. We don't recommend installing applications remotely. To access install mode manually, complete these steps at the terminal server.
Enter the command
change user /install
.
After the installation is complete, you need to return to
application mode
. To do so, enter
change user /execute
from the command prompt.
SQL-based CS Professional Suite applications:
Accounting CS, Practice CS, and Workpapers CS use Microsoft SQL Server to store data. In addition, FileCabinet CS users have the option to store their data in a SQL Server database.
You need to install these applications (or their database components) on a separate server that will act as the SQL Server before you set up your terminal server.
For best performance, we recommend a dedicated SQL Server; the terminal server should not also act as the SQL Server.
After you install the database component — and in some cases, the application files — on the SQL Server, you can proceed with a typical terminal server setup for your environment.

 Article,
3 min read
Article,
3 min read